How to test visible mold damage (or suspect mold)
For visible mold or a discoloration that is suspect mold – Lift
the tape by the tab and press the window area gently onto the
surface you wish to sample (do not touch the mold or suspect
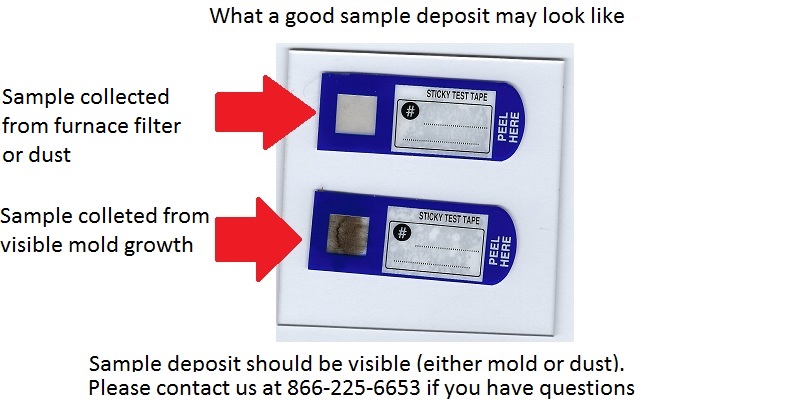
mold with your hand). Make sure there is a visible deposit.
How to test for hidden mold growth
- — To determine if there is mold growth in a suspect area you should sample dust that has settled on a horizontal surface in the area of concern. An example of this is collecting a dust sample from on top of a desk or dresser in a room where a person is having abnormal health symptoms. Please note: It is important that there is a visible deposit of dust in the sample so it may be necessary to drag the tape across the horizontal surface.
- — MOLDetect will look at the dust sample under the microscope and if there are abnormal mold types (‘indicator spores’) or an atypical dominance of spores then that will indicate abnormal mold growth in the vicinity.
- — Mold spores are microscopic in size and some float into the air, eventually settling in the dust. Thus, testing the dust can give a good history of spores that have been airborne (since the last cleaning).
- — Indicator spores, such as Stachybotrys (aka “TOXIC BLACK MOLD”), Chaetomium, or Ulocladium are generally not present in the outdoor air and therefore their presence represent indoor mold amplification (growth).
- — The prevalence of a mold type not typically predominant in the dust (e.g., Aspergillus/ Penicillium types) is an indication of nearby indoor mold growth with that type of mold.
How to do a general screening for mold in a home/ business that has a central HVAC system
By collecting a dust sample from the return side of a furnace filter you can perform a general screening of the area the furnace services
- — Remove the furnace filter and touch or drag the window of the MOLDetect test tape across the return side of the filter (side furthest away from furnace) so that there is visible deposit of dust is present in the test tape window.
- — With a central furnace system, conditioned (heated or a/c) air blows out the supply register, circulates in the room and then finds its way to the return air register where it makes its way back to the furnace to be reheated or re-air conditioned after passing through the furnace filter. A percentage of the particles in the air, such as mold spores and other dust contaminants, get captured and removed from the air stream by the filters.
- — Testing the furnace filter represents what contaminants have been circulating through the house or zones serviced by the furnace.
- — Testing the furnace filter does not specify where the mold is coming from, but it is a good initial screening procedure to determine if further investigation is warranted.
- — The return air side of the filter is the side of the filter test.